Content Below Left Nav
Left navigation content boxes are sourced from Related Asset Listing results, which use Thesaurus Term 'tagging' to 'relate' content to specific sections/pages.
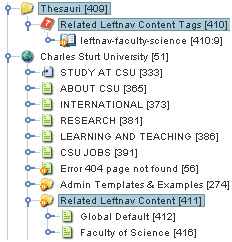
The Related Asset Listing ('Tagged Leftnav Content' asset #396) is linked into the main Parse File through a Nested Design Area and stored in a root level 'Design Helpers' folder which allows for ease of access/editing by CSU web administration via the administration interface.
Related content is source from Standard Page Assets located in a centrally managed folder called 'Related Leftnav Content' (#411) kept under the main site asset. This will allow web administrators and authorised users to re-use and add/edit this content from a central location.
Asset listing results allow for the following output:
• Flexible markup output and CSS/JavaScript control/styling.
Asset listing no results:
• Produce 'default' output, found in 'Global Default' (#412).
How to?
The following screen shot shows where tags and content are created which the Related Asset Listing ('Tagged Leftnav Content' asset #396) uses to render content to the front end.
Follow these steps to ensure leftnav content can be viewed for a sites/sections/pages:
- Right click on the 'Related Leftnav Content' (#411) folder and select 'New Child' > 'Pages' > 'Standard Page'. Give this new page a name that reflects the area/page you will be using it on.
- Right click on the new page created and select 'Edit Contents' and Acquire the lock on this asset.
- Create the content required using the WYSIWYG or convert to Raw HTML to ensure you do not get erroneous markup that can occur when using the normal WYSIWYG. Alternatively, you could link or nest in other content if required.
- Save the changes you have made to the new page.
- Right click on the 'Related Leftnav Content Tags' (#410) Thesaurus asset and select 'New Child' > 'Lexicon' > 'Thesaurus Term'. Give this new tag a name similar to the new page created in step 2. Use a consistent format starting with 'leftnav-' e.g. leftnav-newareaname.
- Right click on the new page you created in step 2 and select the 'Tagging' screen. Apply the new term created in step 5.
- To make the content appear in the leftnav on the front end:
- For entire sites/section, right click on the parent asset and select the 'Tagging' screen. Apply the new tag created in step 5 and ensure 'Cascade tag changes' is selected to ensure all current children are effected.
- For smaller sections or individual pages, right click on the parent asset and select the 'Tagging' screen. Remove any existing 'leftnav-' tags that may already be used by selecting 'clear' next to the related tag, and changing its weight to '0'. Select 'Cascade tag changes' to remove from any existing children or de-select 'Cascade tag changes' ensure only the asset in question is affected.
Important Notes
• You could set the div properties to use 'Content Type' to 'Nest Content' to nest in another asset. For example you might want to re-use an asset listing, or another standard page of markup across multiple pages. You could also 'link' other standard pages or their div contents to achieve the same results.
• If the content does not appear, check 'Design Helpers > Related Content > Tagged Leftnav Content' asset in the 'Related Leftnav Content' folder has a linking value of "root" and link-type "NOTICE".