Organise subject content

Organise and manage your subject content.

Update: New Content Experience and Immersive View

In the August 2026 update of Brightspace there have been some changes to the user experience and presentation of content for staff. All other functions and processes for organising, creating and editing content remain the same.

This update has implemented:

Full-width table of contents style ‘Content’ landing page

Screenshot of the new Full-width table of contents style Content landing page.

Benefits:

  • Visual continuity between content landing page and immersive view.
  • Provides immediate overview of subject contents.
  • Simplifies and smooths navigation to content (especially in complex folder structures).
  • Smoother subject architectural changes.

Immersive view

Screenshot of new immersive view for content pages.

Benefits:

  • Wider layout allows for improved readability.
  • Breadcrumbing navigation helps track page location at the top of the page.
  • Minimalised nav bar reduces distractions and cognitive load.

In Brightspace, you use the Content tool to create, organise and deliver subject content. This tool allows you to present information using a variety of learning materials, such as:

  • Text
  • Multimedia
  • Embedded files
  • Brightspace activities

Please note: If two users are editing a Brightspace site simultaneously, the last person to click save will override any content recently saved by other users.

It is important to organise your subject content in a way that is consistent and easy to navigate. Navigation involves the way users move from one section or topic to another. Effective navigation promotes engagement and allows students to focus their energy on learning. This page describes the steps you can take to achieve this.

Initial considerations

Before creating your subject content, you will need to make a few key decisions. Careful planning can positively impact the student experience and promote student success.

Every Charles Sturt subject is unique, and there is no singular 'right' way to organise your content. Interested in discussing your subject further with an Educational Designer? Log a Service Request.

Brightspace organises content into levels to provide a structured and efficient learning experience. At Charles Sturt, we encourage the use of a two-tiered approach to subject organisation. This reduces the overall complexity of the subject structure and reduces confusion for students and instructors.

First Level: Topic – Consider the topic as the ‘container’ that holds all the content associated with it.

Second Level: Page – Underneath a topic, you add a series of pages. The pages contain the learning materials that you want students to engage with. These materials might include text, multimedia, embedded links, or other Brightspace activities. By using a series of pages, you can divide your content into small, manageable pieces.
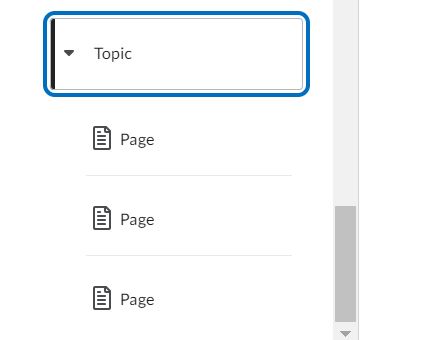
Screenshot of the Content screen in Brightspace, featuring a two-tiered organisation. The main topic is displayed at the top, followed by three HTML pages arranged beneath it. This image illustrates the hierarchical structure of the subject organisation within the platform

Clicking: Indicates the level of learner interaction required to move between content pages and learning activities.

Scrolling: Indicates the quantity of content displayed on a single page and the degree of vertical navigation required to access it.

Learners generally benefit more from clear navigation with multiple focused pages than from long scrolling pages. Content should be grouped by relevance, with only directly related materials presented together (e.g. Weekly reading and directly related Learning Activity 1 on the same page). This approach supports content chunking, improves progress tracking, and enhances the overall learning experience.

Examples

  • All topic content on one page (too much scrolling):

  • Topic content split into relevant pages with clear headings:

Screenshot of the learner Content screen in Brightspace. The image depicts the page names for Topic 1 Risk management: *Overview – Topic 1; Read – What is risk management? ; Watch – Risk assessment; Discuss – Risk management principles; Apply – Risk management quiz; Summary – Topic 1;

When designing content in Brightspace, your goal is to create a consistent pattern. This makes the subject content more predictable and helps students understand what is expected of them.

Below is an example of a consistent learning pattern. Each topic follows the same structure, including a checklist at the end. You can use checklists to summarise the important content covered in each topic.
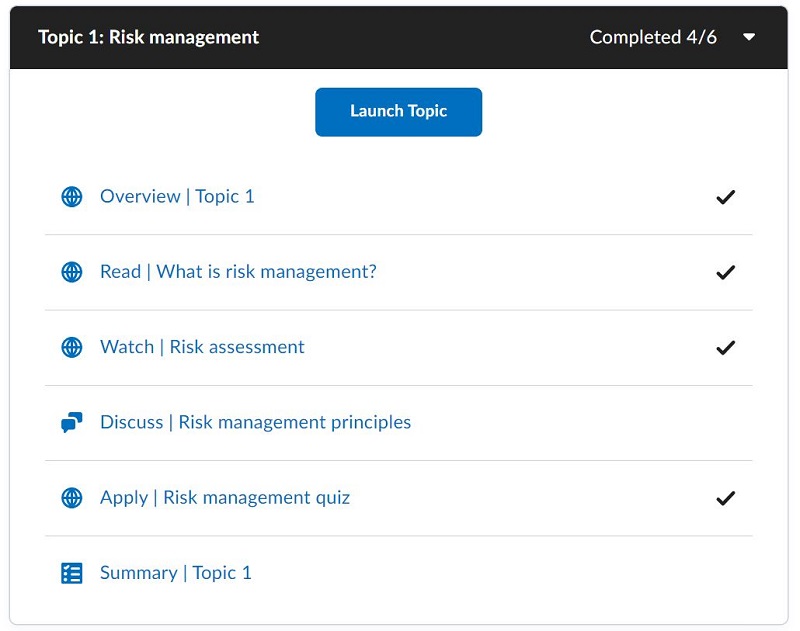
Screenshot of the learner Content screen in Brightspace. The image depicts the page names for Topic 1 Risk management: *Overview – Topic 1; Read – What is risk management? ; Watch – Risk assessment; Discuss – Risk management principles; Apply – Risk management quiz; Summary – Topic 1;

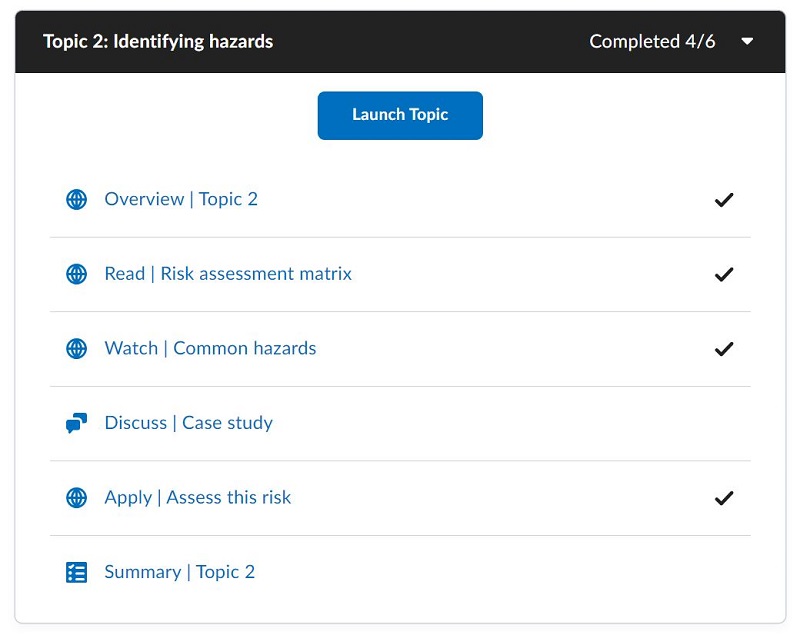
Screenshot of the learner Content screen in Brightspace. The image depicts the page names for Topic 2 Identifying hazards: Overview – Topic 2; Read – Risk assessment matrix; Watch – Common hazards; Discuss – Case studies; Apply – Assess the risk; Summary – Topic 2.

You can tailor the learning pattern to suit your subject's specific requirements. Just keep in mind that consistency is key.

Well-constructed and meaningful titles contribute to a user-friendly experience. Here are some tips to help you achieve this:

  • Use clear and descriptive titles that provide an overview of the content.
  • Keep names concise and to the point. Long names do not display well, particularly in the navigation menu.
  • Use student friendly language, avoiding unnecessary complexity or jargon.
  • Use verbs to describe what is expected of students e.g., read, watch, discuss, practice, apply.
  • Use the heading in the navigation bar as the top-level header of your page.

It is important to use a consistent layout and formatting when organising your content. In Brightspace, this is achieved by using the HTML templates. These templates allow you to apply consistent heading styles and other visual features. This helps students efficiently navigate a page. If you want to learn more about adding different types of content to your HTML page, see Create new material in the Brightspace Community.

Please note: If two users are editing a Brightspace site simultaneously, the last person to click save will override any content recently saved by other users.
How to:

Now that you have decided on the layout of your subject, use the guides below to help you create and implement the different design options.

To create a new topic:

  1. Click on the Content expanding menu in the subject navigation bar.
  2. Click on New Topic.
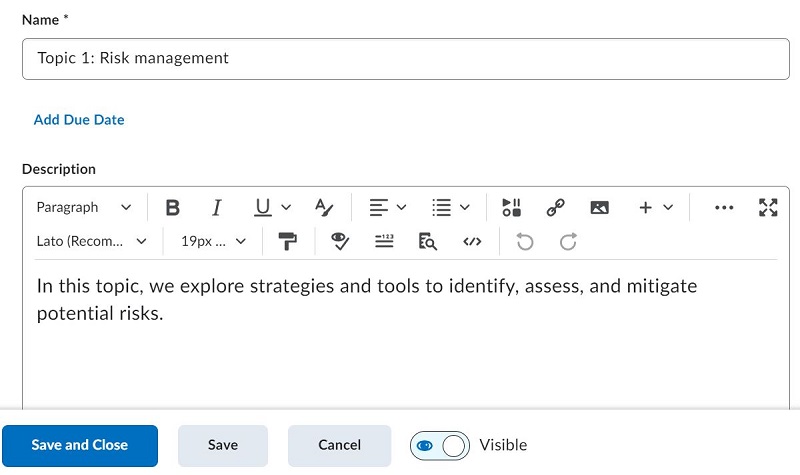
  3. Enter a Name for the topic.
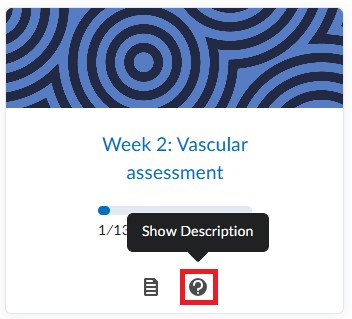
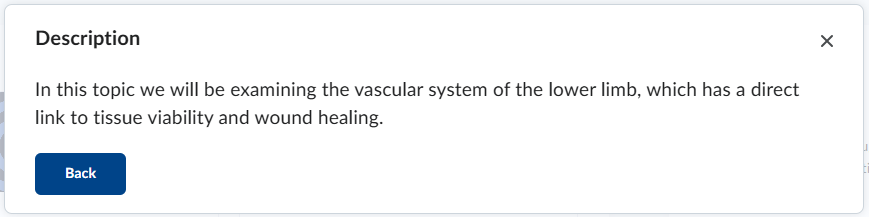
  4. Include a short Description, about 1-2 sentences, to give a quick overview of the topic. Do not add images or videos to these folders as they often don’t display well. This description will be visible when students click on the Show Description icon on the tile. Think of it like a brief summary, not a substitute for your main topic overview.

    Screenshot of a topic tile in Brightspace from a learner's perspective. The image depicts that the information button that is in the top left-hand corner of the tile.

    Screenshot of the back of a topic tile in Brightspace from a learner's perspective. The image depicts that once you select the information button, the tile flips, revealing the topic description

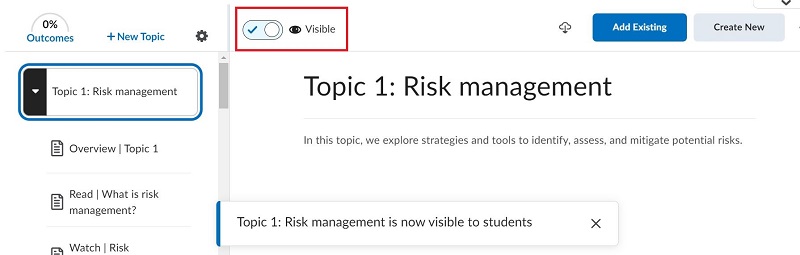
  5. Use the visibility toggle to make the topic visible or hidden from students on creation.

    Screenshot of the topic page in Brightspace. The visibility toggle is shown in the bottom right-hand side of the image, demonstrating how you make topics visible or hidden from students.

  6. Click Save.

The new topic is added to your subject.

To create and add new pages:

  1. Click on the Content expanding menu in the subject navigation bar.
  2. Click on the topic you are adding a page to.
  3. Click Create New.
  4. Click Page
  5. Enter a Name for the page.
  6. Click Select Template to apply a template to your page (see below).
  7. Click Save.

The page has now been added to your topic.

Please Note: If you add a template to a page that already contains content. Your existing content will be deleted.

To add a template to your page:

  1. Create a new page
  2. Click Select Template and choose which HTML template you want to apply.
  3. Add the page content to the template.
  4. Click Save.

The template has now been added to your page.

To learn more about creating subject content and the various elements you can add, see Create new material in the Brightspace Community.

Please Note: If you hide a topic or folder, all content within that topic or folder is also hidden.

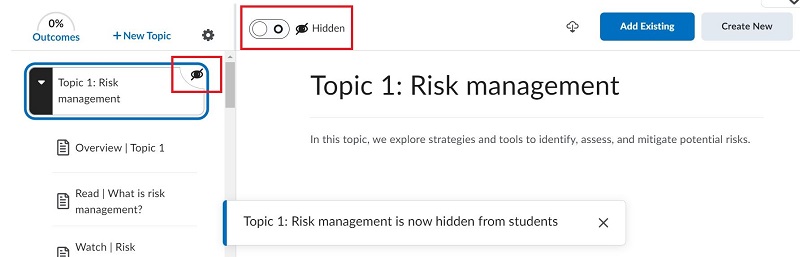
The visibility toggle and icon indicate the status of topics, folders, and pages: Visible or Hidden.

Visibility status is also indicated by icons in the table of contents next to each topic. To change the visibility of a topic or page, select the item and then click the visibility toggle at the top of the page.
Screenshot of the content page in Brightspace. The image depicts the visibility toggle at the top of the page. As the visibility toggle is on, the topic is visible to students.

Screenshot of the content page in Brightspace. The image depicts the visibility toggle at the top of the page. As the visibility toggle is off, the topic is hidden from students. This is also demonstrated by the crossed-out eye icon in the top right-hand corner of the topic in the navigation bar

To reorder content:

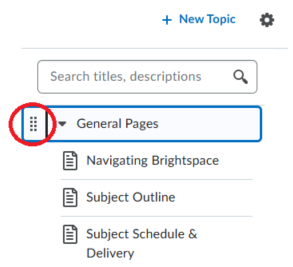
  1. From the content area's table of contents (on the left-hand side), the click topic, folder, or page you wish to move.
  2. Click and hold the  Screen capture of Reorder icon. symbol.
  3. Drag it to the desired position and release your click.

    Screenshot of the content page in Brightspace. The options menu has been selected and the drop-down menu contains Edit, View Release Conditions, Reorder and Delete. The Reorder button has been selected, demonstrating that you select it to reorder content.

Creating a Checklist

  1. In your subject site, click ‘Subject Admin’ in the banner menu.
  2. Screenshot of Brightspace subject site banner menu. Red box highlights the 'Subject Admin' item.

  3. Under ‘Assessment’, click ‘Checklists’.
  4. Screenshot of Assessment menu items in Subject Admin. Red box highlights 'Checklists' item.

  1. Click ‘New Checklist’.

    Screenshot of top menu in Checklists page. Red box highlights the 'New Checklist' button.

  1. Give the checklist a name (and optionally, a description).
  2. Screenshot of New Checklists page. Red box highlights the Name field.

  1. Click ‘Save’.

    Screenshot of bottom menu on New Checklist page. Red box highlights 'Save' button.

  1. Under Categories and Items, click ‘New Category’.
  2. Screenshot of Categories and Items sub-menu. Red box highlights 'New Item' button.

  3. Give the category a name (and optionally, a description).
  4. Screenshot of 'New Category' page. Red box highlights the Name field.

  1. Click ‘Save’ if only making one category OR ‘Save and New’ (and repeat steps 7 and 8) if making more. 

    Screenshot of bottom menu of 'New Category' page. Red boxes highlight the 'Save' and 'Save and New' buttons.

  1. Under ‘Categories and Items’, click ‘New Item’.

    Screenshot of Categories and Items sub-menu. Red box highlights 'New Category' button.

  1. Complete the required fields:
    1. Select the appropriate category
    2. Name the item
    3. Optional: Provide a description or instructions
  • Note: Leave the Due Date unchecked.

Screenshot of 'New Item' page. Red boxes and arrows highlight the Category drop-down, Name field and Description field.

  1. Click ‘Save’ if only making one category OR ‘Save and New’ (and repeat steps 10 and 11) if making more. 

    Screenshot of bottom menu of 'New Item' page. Red boxes highlight the 'Save' and 'Save and New' buttons.

  1. Optional: Click the ‘Restrictions’ tab and click either ‘Attach Existing’ OR ‘Create and Attach’.
  2. Screenshot of 'Restrictions' tab. Red arrows point to the 'Attach Existing' and 'Create and Attach' buttons.

  1. Attach Existing: Select appropriate condition and click ‘Attach’. 

    Screenshot of Attach Existing menu. Red boxes highlight existing release conditions and 'attach' button.

  2. Create and Attach: Select appropriate ‘Condition Type’ and ‘Condition Detail’, then click ‘Create’.

Screenshot of New Release Condition screen. Red boxes highlight the Condition Type and Condition Details drop-down menus as well as Create button.

  1. Optional: Select appropriate condition satisfaction. 

    Screenshot of satisfaction conditions for release condition drop-down.

  1. Click ‘Save and Close’.

Screenshot of the bottom menu of Create a New Checklist menu. Red box highlights 'Save and Close' button.


Deploying a Checklist

  1. Navigate to the content folder you wish to deploy the checklist.
  2. Screenshot of Brightspace subject site banner menu when in 'Content' section. Red boxes highlights the 'Content' item and Content folder.

  1. Click ‘Add Existing’.
  2. Screenshot of top right-hand menu of content folder. Red box highlights 'Add Existing' button.

  3. Click ‘Checklist’.
  4. Screenshot of Add Existing menu. Red box highlights Checklist option.

  1. Click the appropriate checklist.
  2. Screenshot of 'Insert a Checklist' screen. Red box highlights selecting the appropriate checklist.

  1. Click toggle to make checklist visible. (Example below shows with release conditions attached.)

Screenshot of the visibility toggle.

This page may be updated at any time. If you print it, you could miss future changes. Please check this page regularly for the latest updates.